Weatherus Horibilus'07
Hi Trevort
I also meant to mention as far as a concentricity guage goes you can make one quite easily. All you need to buy is a dial guage from Bunnings, a small bearing from a model shop and get together a few bits to make the frame and you are in action.
If I get a chance I will post a piccy of mine - all home made and cost about $40.
- Ned Kelly
- .270 Winchester
- Posts: 1277
- Joined: Tue Oct 31, 2006 6:39 am
- Favourite Cartridge: 6PPC
- Location: Macedon Ranges Vic
G'Day Trev,
you are correct, but when neck turning you cannot load a bullet then measure. Once the cases are expanded to suit your neck turning mandrel, you certainly do not want to load a bullet into your cases, and then resize/expand to suit the turning mandrel again.
The Haydon modified Mitutoyu tubing mike also measures to 1/10,000 of an inch and when turning ppc brass you can measure easily to 1/10,000 with repeatablity.
To work out your loaded overall diameter, you double the measured neck wall thickness and add the bullets measured diameter to get your overall diameter without having to load a bullet into the case you are turning. So when you are done turning, you already know your overall diameter before you load a bullet or chamber a round. Very nice to know with tight neck chambers.
I will take some photos of the tool to show you when I get a chance.
Cheerio Ned
Trevort & Knackers
Here are some piccy's of the concentricity guage that I made.
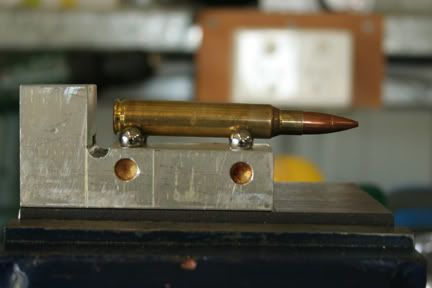
The first picture is of when I was working out the height for the centre of the little bearing that the bullet runs in. The balls support the case with a slight downward angle. The centre height of the bearing for the bullet to turn in is 0.050" higher than the point of the bullet in this picture. What that does is allows the case to clear the front balls when straigtening your bullets.
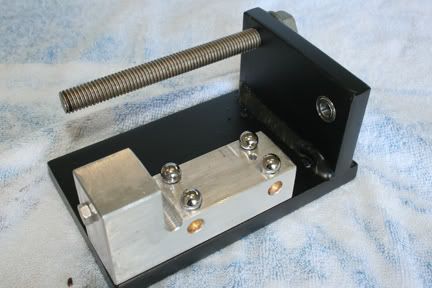
This next picture is of the base structure for the guage where you can see I have the verticle piece of steel with the little bearing and bar for the dial guage to attach to.
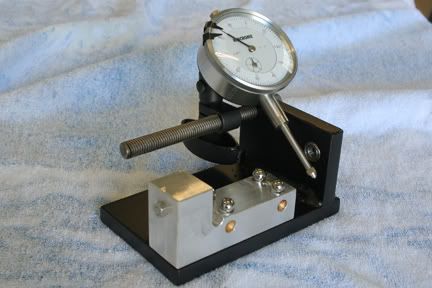
This is just the base with the dial guage fitted.
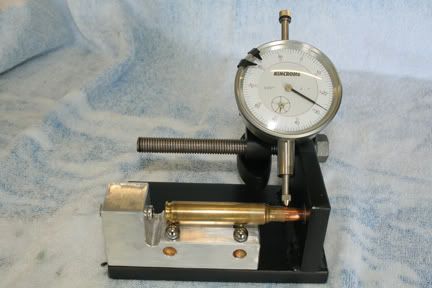
These last pictures show how a round can be measured. In these pictures you can see how the case sits above the front balls when in the bearing and you will also notice the small screw through the left hand end of the aluminium just behind the case. This screw is slightly curved on top and fits into the primer pocket so when the case is being prepped it can be slid (along with the dial guage) to the left to measure any runout at the case neck or anywhere along the case while the case would sit on all four balls.
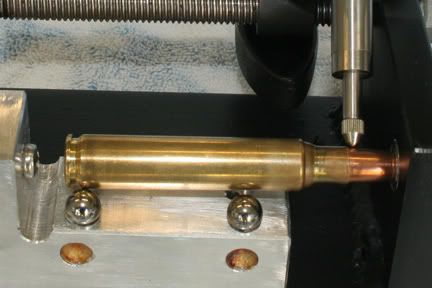
As I said previously this was all made for less than $40 and in a couple of hours.
Hopefully this will inspire you to build your own and if you need / want any of the specs then let me know and I can provide them
Here are some piccy's of the concentricity guage that I made.
The first picture is of when I was working out the height for the centre of the little bearing that the bullet runs in. The balls support the case with a slight downward angle. The centre height of the bearing for the bullet to turn in is 0.050" higher than the point of the bullet in this picture. What that does is allows the case to clear the front balls when straigtening your bullets.

This next picture is of the base structure for the guage where you can see I have the verticle piece of steel with the little bearing and bar for the dial guage to attach to.

This is just the base with the dial guage fitted.

These last pictures show how a round can be measured. In these pictures you can see how the case sits above the front balls when in the bearing and you will also notice the small screw through the left hand end of the aluminium just behind the case. This screw is slightly curved on top and fits into the primer pocket so when the case is being prepped it can be slid (along with the dial guage) to the left to measure any runout at the case neck or anywhere along the case while the case would sit on all four balls.


As I said previously this was all made for less than $40 and in a couple of hours.
Hopefully this will inspire you to build your own and if you need / want any of the specs then let me know and I can provide them
-
woob614271
- 17Rem
- Posts: 1123
- Joined: Mon Jan 29, 2007 8:49 pm
- Favourite Cartridge: 17Rem, 22.250AI, 308
- Location: townsville qld
G'day folks
that is some nice work there , think i have a new project to do now
right now making my own cleaning rods , hey ,does any one know the jag diameter for a 204R , when i got one of the the rifle it came with one of those cheap cleaning kits , and ended up converting the jag to have a pin point to hold patch , spun one up at .130" thou , but still feels loose going through ?
sorry for going a bit off topic folks
Thanks
Andree
Hey thanks for the positive comments 
The "O" ring stops alot of banging when patch/brush or mop pass through the cown of the barrel , also stops any residue oil/solvent creeping back to the bearings !
Drill and tapped one rod 8-32 unc , which will fit most tetra, kleen bore ect type gear ,
On the other 3 rods i put a 3mm male thread on the end ,the standard thread for tetra,kleen bore ect is 3-48 unc but to buy the taps ,they would have cost me around $35 each , so i choose to modify what gear i already had ,
the cost of the 4 cleaning rods i made has been $12 , rest has been kindly donated to me from various jobs
But i will post the build of the rods in the EQUIPMENT section as there is about 15 odd pics ,
Might have to ask Kieth if he could make a DIY section to post on ??
if you are reading Kieth ,what are the chance of that ????
Thanks Andree


